Every spring, our world becomes inundated with eggs. Adults fill colorful plastic eggs with treats and hide them for their children. Stores are packed with candies and chocolates in the shape of eggs. We decorate our homes with images of eggs. And of course, we decorate eggs. These eggs are most often associated with Easter, the holiday that celebrates the return of Jesus from the dead. However, the story of his resurrection does not have any mention of eggs.
How a Christian holiday associated with the return of Jesus from the dead became so synonymous with colorful eggs and rabbits comes from a history of blending between old European pagan traditions and folklore, and the introduction of Christianity to those areas. Oftentimes these traditions are aligned with a celebration of springtime. Egg decorating can be traced back thousands of years, with decorated eggs being found in Egypt. Persian traditions also include painting eggs for Nowruz, the Persian new year, which falls on the vernal equinox. As Christianity came into dominance in certain egg-decorating cultures, specifically those in Slavic Europe, the practice was adopted. Many common motifs and patterns from pre-Christian times remained, while new ones were introduced.
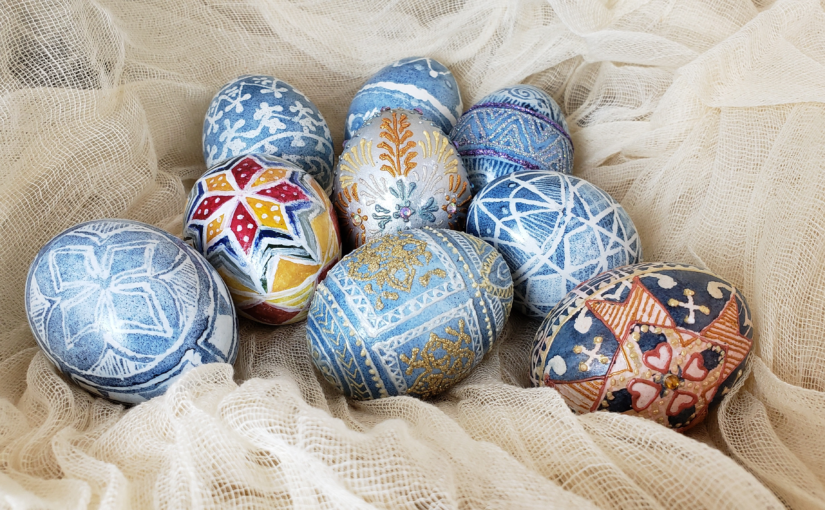
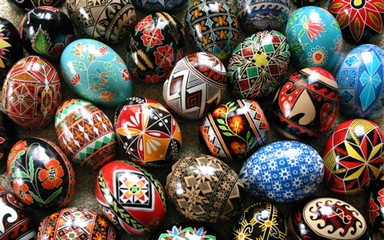
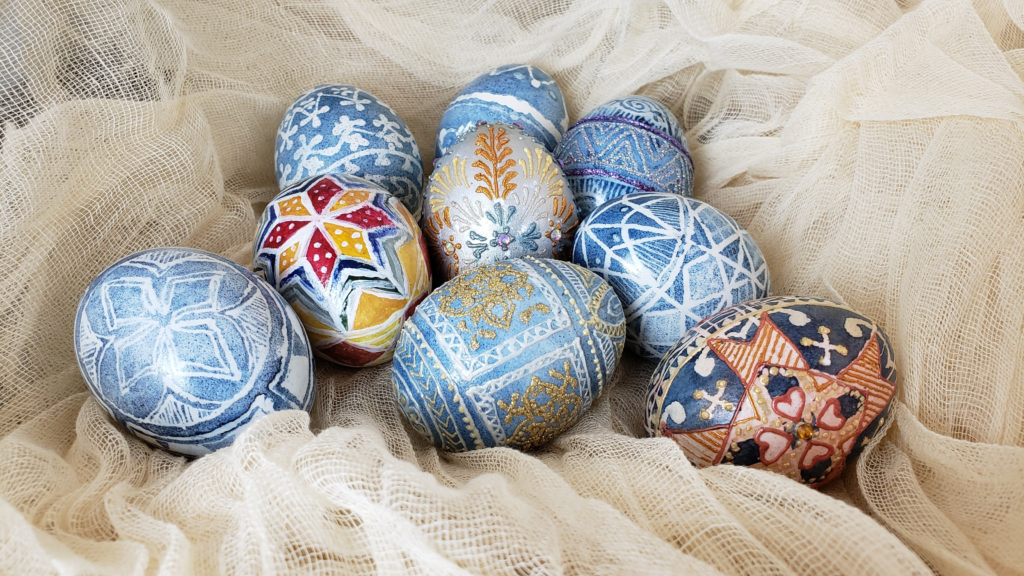
Perhaps the most well-known are the elaborately dyed eggs from Slavic cultures, such as Ukrainian art of pysanky or pysanka, which is a wax-resist method. The technique involves alternating applications of beeswax and dye in such a way that the wax protects the color of the dye underneath it. It is also practiced in Hungary, Lithuania, and Romania. The video below shows a woman in a historic village of Romania practicing her home’s techniques.
The Technique
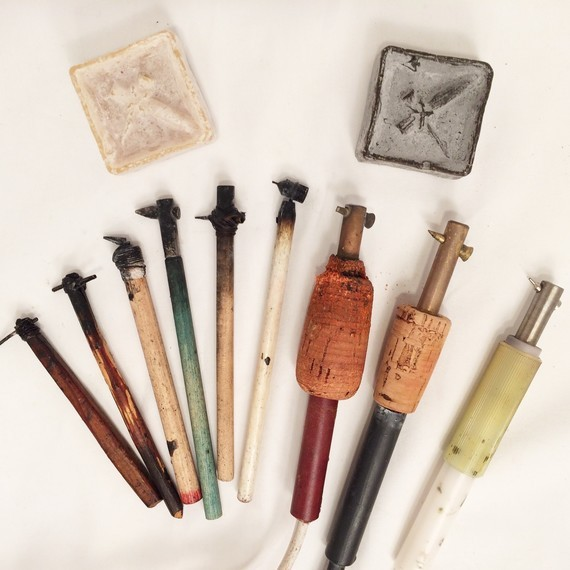
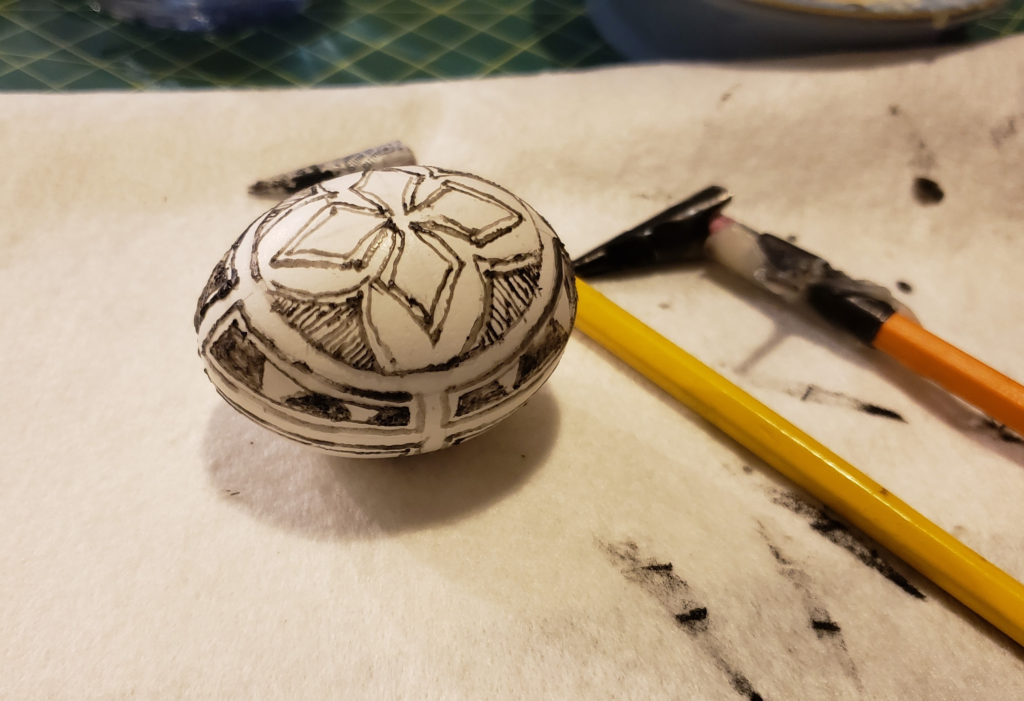
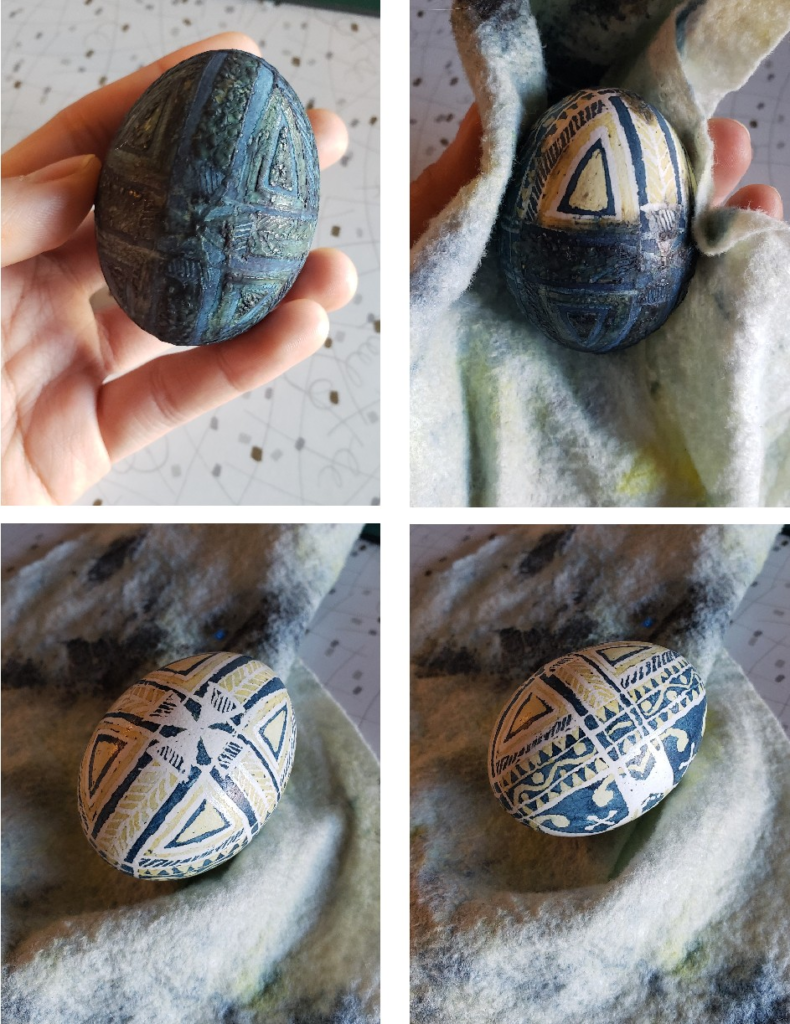
Traditionally, the beeswax is applied with a tool called a kistka, which is a small funnel attached to the end of a stick. It may also be a pinhead or a wire. The tool is used to draw intricate patterns with wax onto the surface of the egg. The first application of wax protects the white of the shell from the dye. The egg is then dyed first with a light color and dried, after which more wax patterns are applied. This continues with successive darker colors of the artist’s choice, with each color protected by the wax that covers it. When all layers are completed, the wax is gently melted away by warming the egg over a flame or in an oven and then rubbed away with a cloth, revealing beautiful, colorful designs.
Eggs are either hollowed of their contents, baked, or hard-boiled. Certain patterns hold symbolic meanings associated with springtime, fertility, farming, and nature. Egg designs will vary from region to region, as individual villages teach the tradition to their younger generations. Those who decorated eggs are most commonly women, and the technique is taught to the daughters. A skilled artist might complete hundreds of eggs each season and sell them to locals and tourists.
Pysanky with Becoming Moonlight®
I decided to give this method of wax-resist a try, using materials from Becoming Moonlight in place of the dyes and techniques that would be traditionally used. Many of the patterns you will see below come from the Spellstone Europe pattern book by Alex Morgan. The patterns in this book are based on traditional patterns related to springtime, the vernal equinox, and fertility. This book and others are available for free download at Hennapage.com. Follow this link to go straight to the E-books.

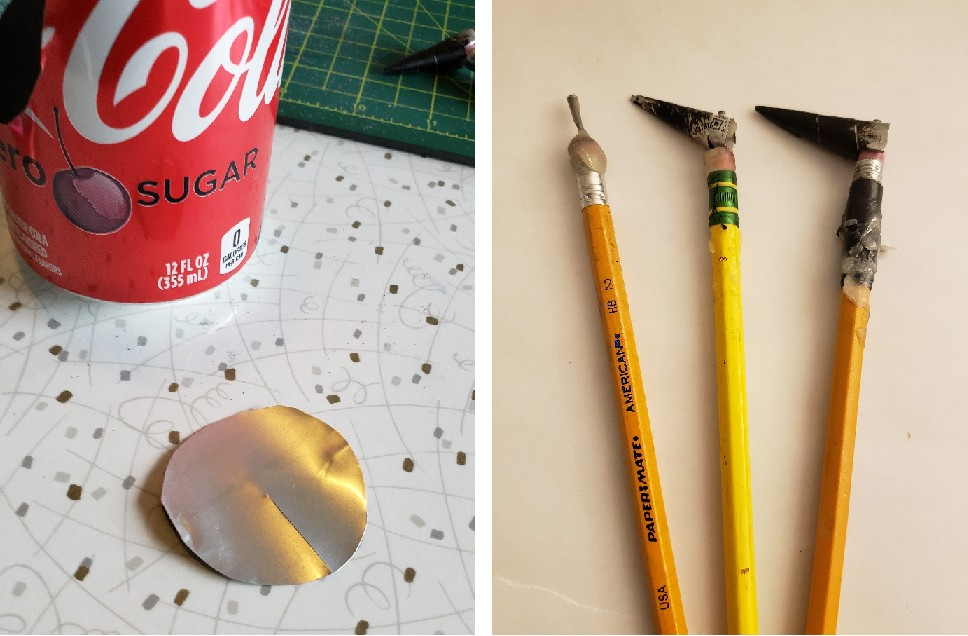
Because I did not have a traditional tool, I created a few. One was simply a pin pushed into the eraser end of a pencil. I could dip the end of the pin into molten wax, then use it to create small lines and dots on the eggshell. This is called the “drop-pull” method and could spread wax only across short distances until there was no wax left on the pinhead. The lines would begin wide, then taper off. I did not quite get the hang of this specific technique, but I did mimic it using Becoming Moonlight® gilding paste and mics powders, which you can see further down in this article.
I also constructed a tool similar to the traditional kistka by cutting a circle of aluminum from the side of a soda can and rolling it into a pointed funnel, not unlike a tiny mylar cone used for gilding paste or henna. I cut a very small amount from the tip to create a hole through which the melted wax could flow, then attached the cone to a pencil by hammering two small brads through the metal and into the eraser end. The funnel can hold more wax, which flowed through the tip like a fountain pen when touched to the surface of the egg. This tool allowed for longer lines of consistent width.
Through my research, I learned that it is best to keep the hand holding the tool steady while rotating the egg. I also found that there were two ways the kistka was used: it was either dipped into molten wax, or it was heated over a flame then used to scoop a small amount of solid wax. By keeping the tool warm, the wax would melt and gradually flow through the tip. I found the latter method to be easier to control.
Ancient Blue®: Crystallized Indigo Vat
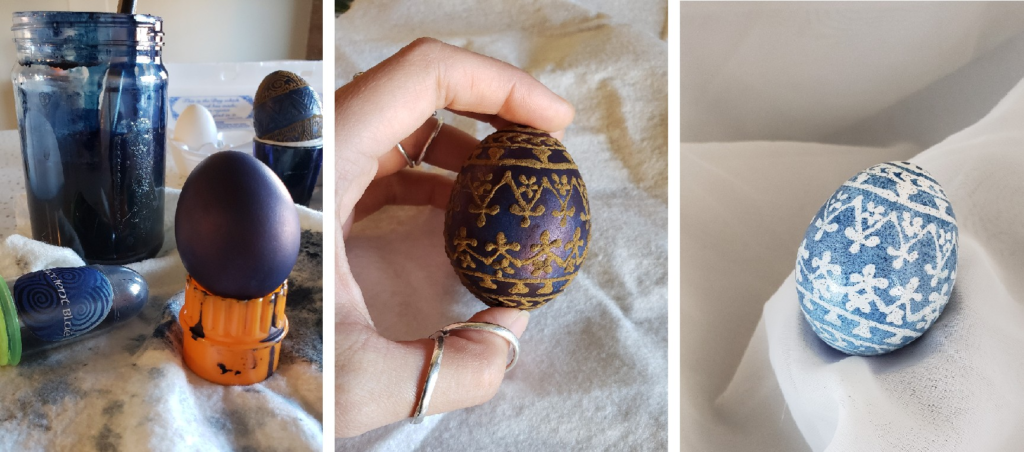
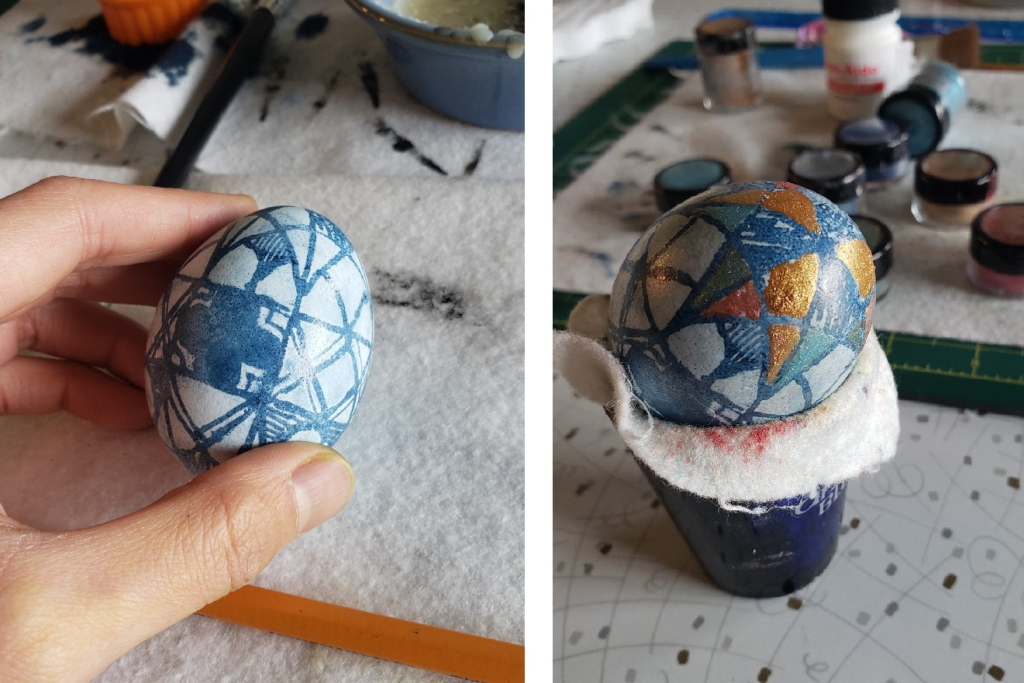
Ancient Blue® is a product from Mehandi which can be used to create blue designs on the skin. It is created by turning a fermented indigo vat into a crystalline state. The crystals are added to water and the resulting liquid can be painted onto the skin creating a stain that will last several days. The effect mimics the blue body art known as woading from the Iron Age of Britain. This indigo is the same kind of dye originally used for denim, as well as fabric-dyeing traditions from India to Japan. Ancient Blue® can be found here at Mehandi.com. More information about its use as body art can be found here.

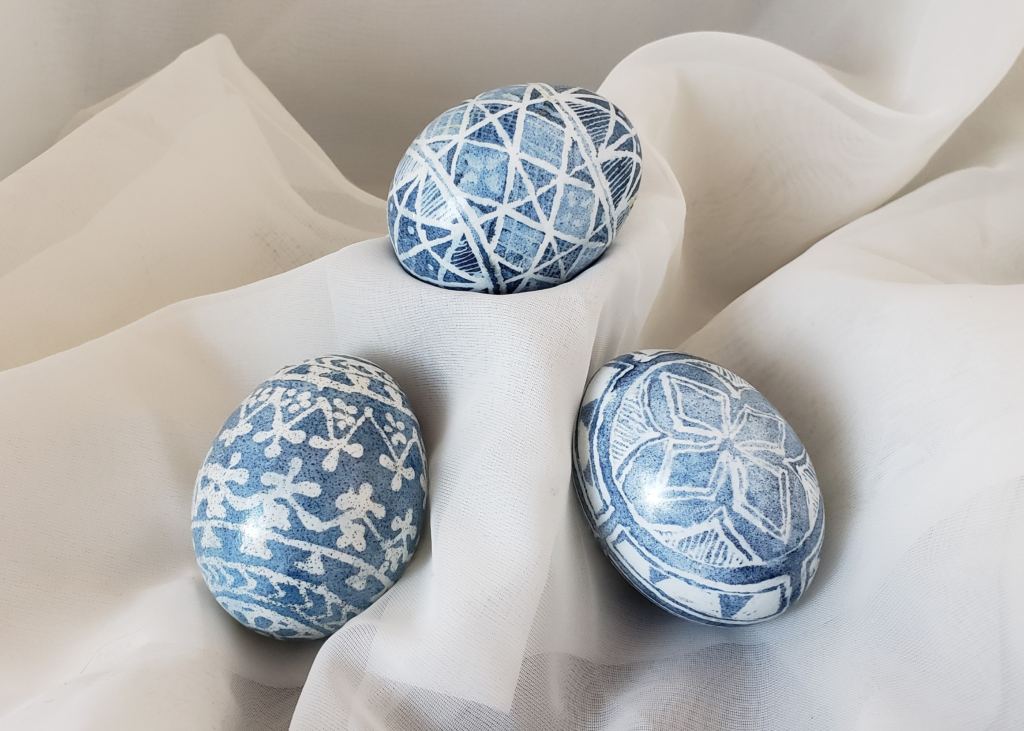
I filled a jar with enough water to fully cover a submerged egg, sprinkled in about a teaspoon of indigo crystals, and let them dissolve for a few minutes. When I dipped the eggs into the dye for a short amount of time, they turned a lovely shade of soft indigo. The eggs became darker with each successive layer. This way, I was able to create monochromatic designs on an egg using a method similar to traditional pysanky, but with one color rather than several. By adding more Ancient Blue® crystals into the vat, I increased the intensity of the dye to achieve darker hues.
If you would like to try this method, I would recommend using boiled or baked eggs rather than hollow ones, as the eggs need to submerge completely under the surface of the dye in order to achieve a deep, consistent color. You could also hollow raw eggs after dyeing them.
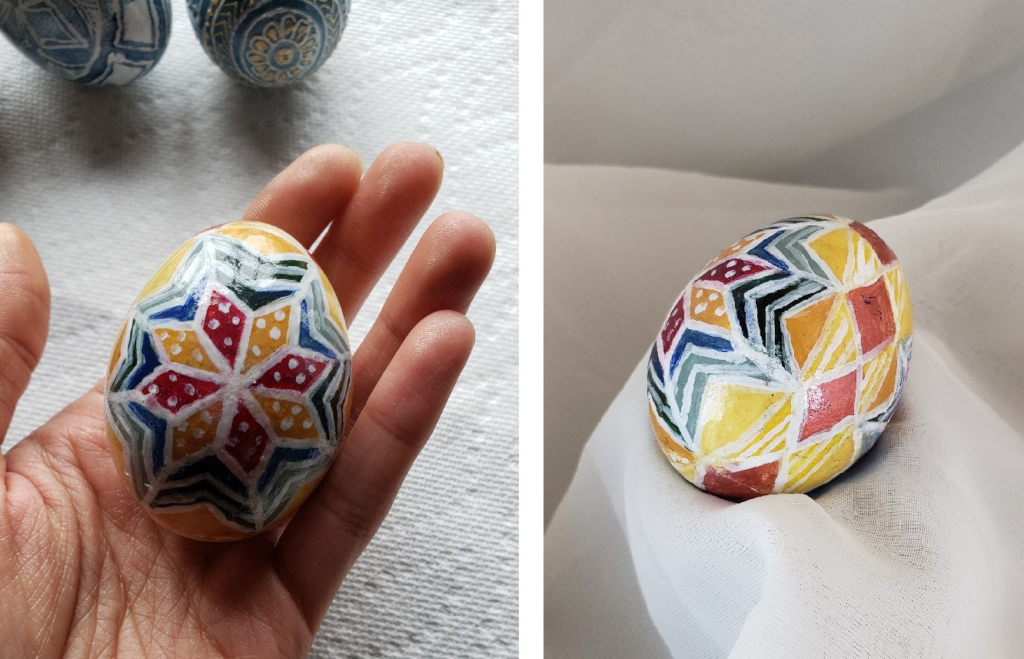
I also played around with turmeric paste and found I could achieve a pale yellow color on the eggshell. I mixed turmeric powder, water, and a small amount of vinegar into a thick paste and coated the egg, letting it sit for a couple of hours. The result was a pale, bright yellow similar to a highlighter color. I then waxed those areas I wanted to keep yellow, and dyed again with indigo.
Becoming Moonlight® Gilding Paste and Gilding Powders
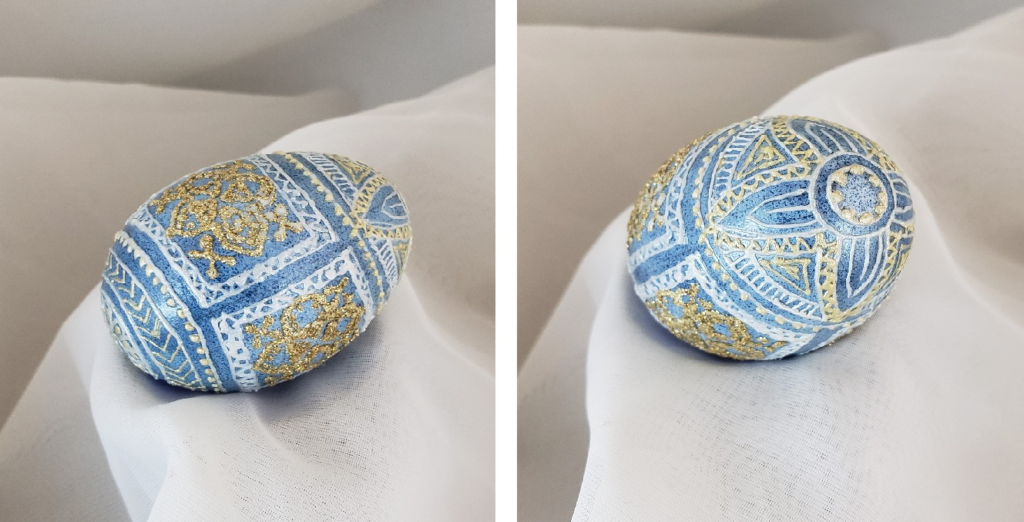
A Becoming Moonlight® alternative to wax resist is the gilding paste resist. Becoming Moonlight® gilding paste is an adhesive which is applied via a cone, much in the same way traditional henna is done. Unlike traditional henna, the paste contains no dye and sits on the top of the skin. It is sealed with a glitter or mica powder, allowing for a henna-like design in any imaginable color. It is especially nice for “white henna” body art. Because the paste is water-resistant, it is a suitable material for resist dyeing. One can apply a design using gilding paste, seal the paste with mica, then apply Ancient Blue® overtop. When the gilding paste is removed, a white design is left behind where the paste protected the eggshell from the indigo dye. Be sure to peel off the gilding paste immediately after the Ancient Blue® indigo dye has dried, as gilding paste will be very difficult to remove from the egg after it has been left too long. Unlike skin, eggshells are hard and brittle, which can make removal of gilding paste more difficult.
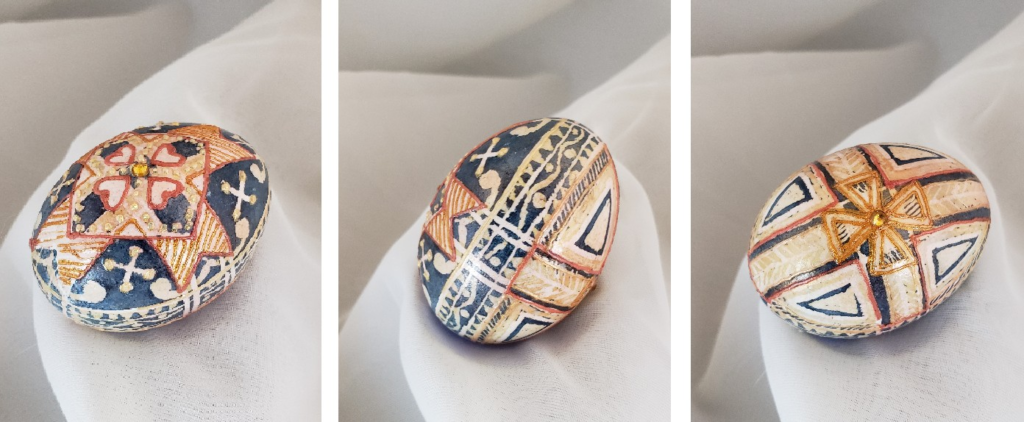
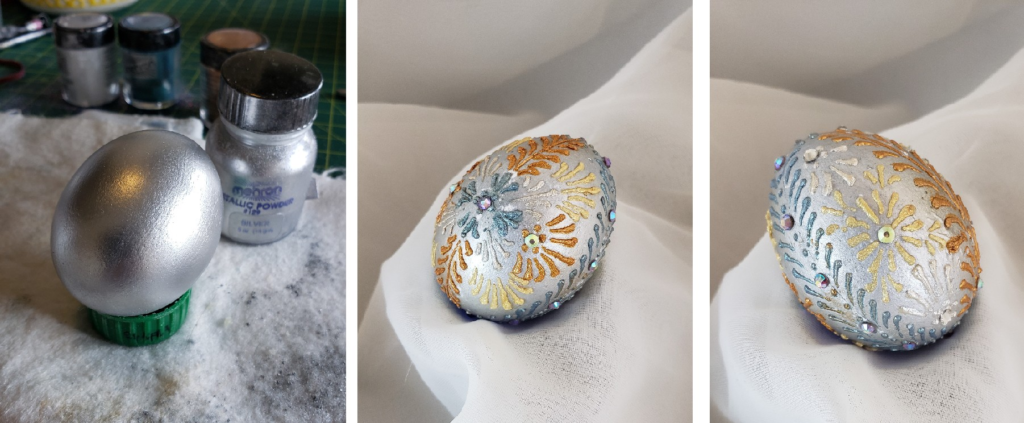
The gilding paste can also be used as a decorative material itself, to mimic the beautiful golden and jeweled designs of Faberge eggs. Simply apply gilding paste designs to a dyed egg, allow the paste to set for about ten minutes, and finish with shimmery mica powder and crystal gems. Note: gilding paste cannot be left unsealed, as it is an adhesive and will be very sticky to the touch even when dry.
Becoming Moonlight® Gilding Kits contain enough gilding paste, glitter, mica powder, and gems to easily complete several eggs. You could also use it for its original intent, which is to create sparkly designs on the skin which can last for several days. Paste, glitter, mica, and gems can also be purchased individually here.
False Resist with Henna Paste
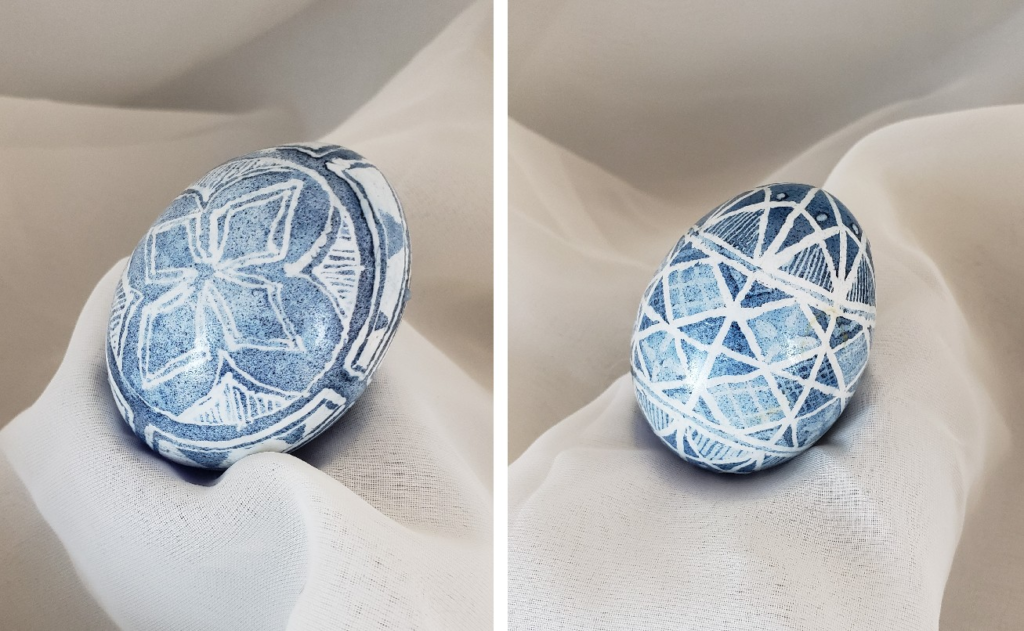
Another way to achieve a similar result as a wax resist is to dye the entire egg with Ancient Blue® indigo, then apply designs in henna after the dye has dried. I discovered this through experimentation, expecting the henna to deposit additional dye over the deep blue color. Instead, the indigo dye detached from the eggshell where the henna was applied, leaving the original white. This is because Ancient Blue® indigo vat is alkaline, as is the calcium in the eggshell, and henna paste, which is made with lemon juice, is acidic. I confirmed this hypothesis by rubbing an indigo-dyed egg with regular vinegar and saw that the blue dye was removed.
I found that I could also apply wax designs to an indigo-dyed egg, then rub it with vinegar until only the dye protected by the wax remained. This resulted in a design opposite to a regular wax resist wherein the majority of the egg is white except for where the wax was applied.
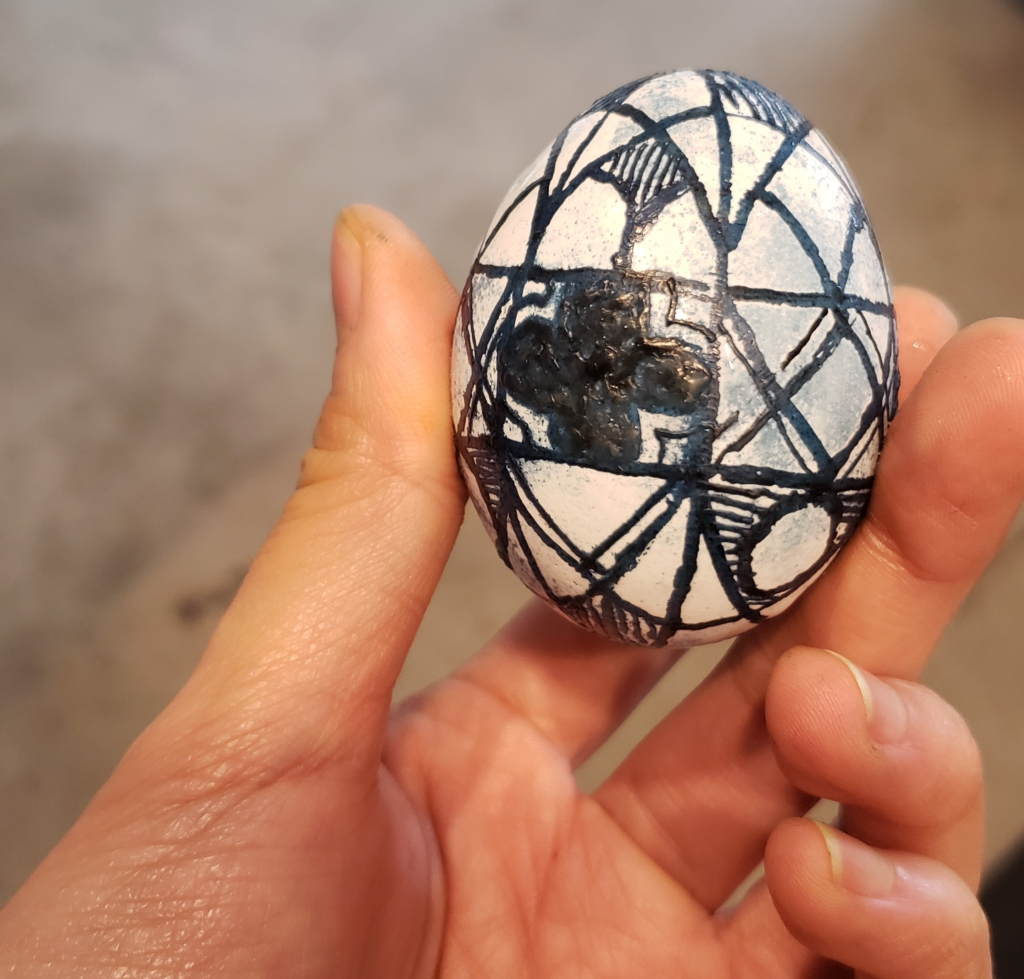
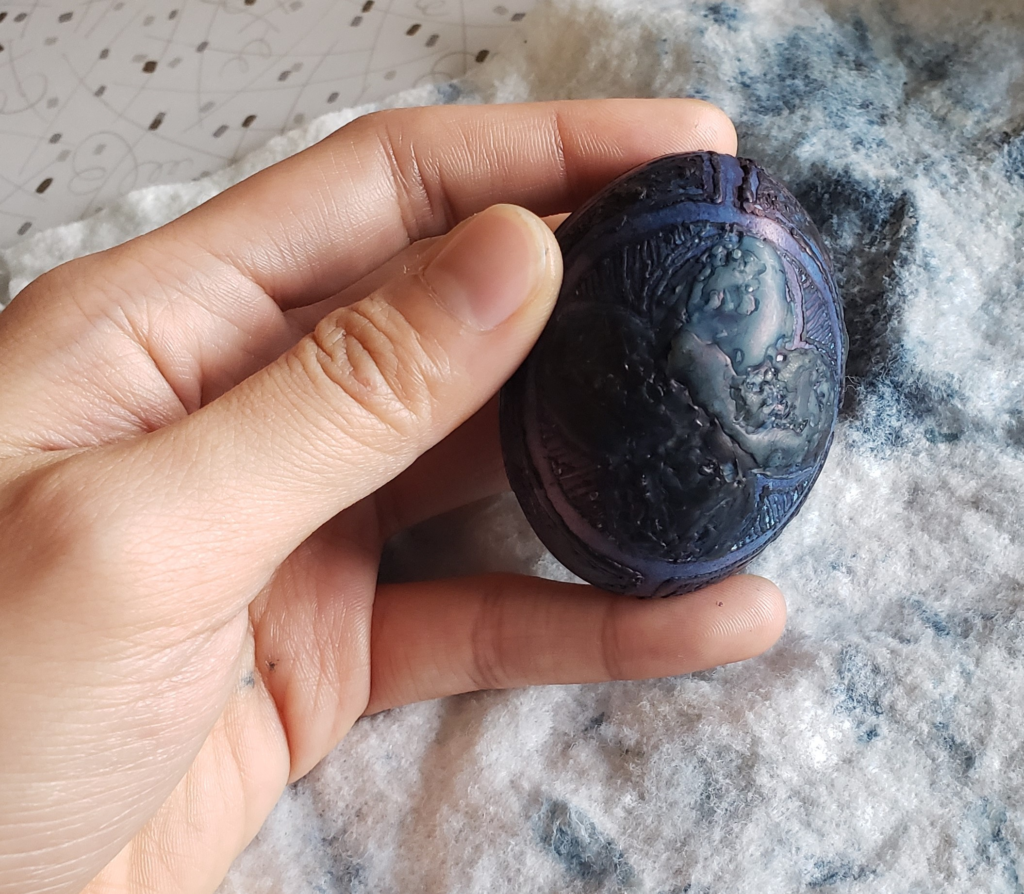
Some excess indigo dye transferred onto the shell during wax removal, coloring the shell a light blue. I didn’t mind this; it looked quite pretty this way. I then began filling in spaces with Pros-Aide liquid® and Becoming Moonlight® mica powder for a stained-glass effect. Like Becoming Moonlight® gilding paste, Pros-Aide® liquid is an adhesive that dries tacky and is then coated with a powder or glitter. The liquid can be applied to a brush and it dries flat. Unfortunately, I dropped this egg before I was able to complete it.
Temptu® Dura Temporary Tattoo Paints and Mehron® Powders
Mehandi also supplies body art products such as paints and powders. Temptu®DuraS paints are acrylic-based and water resistant, making them great for egg-decorating. I decorated one egg entirely with Temptu® Dura body paints in the style of a traditional pysanky wax-resist egg. Because Temptu® leaves a tacky surface when dry, I dusted the egg with baby powder between applications to make it easier to handle and to prevent fingerprints. When the powder had set, I rubbed off the excess with a soft cloth and continued painting. Find Temptu® Dura paints here at Mehandi.com.
Mehron® metallic powders and precious gems powders are ultra-fine and intensely pigmented. The metallic powders create a gorgeous flat shine and the precious gems powders come in a variety of shimmering colors. They can be mixed with Mehron® mixing liquid and applied with a paintbrush, or dusted over Temptu® paints and Becoming Moonlight® gilding paste. I decorated an egg in the drop-pull style using Mehron® powders. I first painted the entire surface of the egg with Temptu® Dura in white, then buffed it with silver Mehron® powder. I then applied Becoming Moonlight® gilding paste mimicking the drop-pull wax-resist style and dusted the pattern with Mehron® precious gems powders. I then finished it with Becoming Moonlight®gems. Mehron® products can be found here.
Final Notes
Before beginning your project, be sure to wash your hands so they are free of oils or dirt which may transfer to the eggshell and cause uneven dye results. It also helps to rub the eggs clean with vinegar. You can plan out your design by drawing on the egg very lightly with a pencil, but do not use the eraser. To remove unwanted pencil marks, rub them with a cotton swab dipped in vinegar.
It is helpful to use rubber bands and circular stencils to guide your pencil marks for straight, symmetrical lines. Ground your wrists on a stable surface when decorating to help prevent mistakes. I found that keeping the egg nestled in a soft cloth, or on a plastic ring (such as one from a milk bottle) was also useful to prevent excess movement.
Be patient and allow each layer of wax, dye, or body art product to dry fully before continuing. You will not want to ruin one side of the egg by continuing onto the other side too hastily. Wash your hands often to keep your egg clean as you handle it.
Wax-resist eggs, especially if they are hollow, can last virtually forever due to the thin wax coating left behind when it is finished. As long as the shell is not cracked, the egg inside should not rot. If the egg is hollow, it will definitely last. Many traditional eggs have lasted for decades, kept within one home or passed down through generations. Be sure to store and move them with extra care, as they will crack if dropped. For extra protection, I preserved all of my eggs by spraying them with a clear gloss sealant that can be found at any craft store.
If you have Becoming Moonlight® body art products at home or are interested in putting a new spin on your egg-decorating this Easter, feel free to try any or all of these techniques! None of the Becoming Moonlight® body art products are toxic, nor will they permeate through the shell, but I do not recommend eating your decorated eggs. These products are not graded for food safety. Keep your eggs for seasonal display for years to come. They will be sure to stand out in your home and celebrations. Comment below with your egg creations, or if you have any questions about the products and methods